|
|
You are here: Foswiki>Main Web>WikiUsers>WikiGuest>GlobusUTSAEndpoint (31 Oct 2025, AdminUser)Edit Attach
UTSA Endpoint
UTSA has a public endpoint with a mapped collection available to all users on campus. To access the endpoint click on the Collections icon on the left menu and search for UTSA Globus Endpoint (globus01), then click on the icon to request access. If you have submitted a ticket with the RCSG team for them to make a directory for you on the endpoint, change directory into your directory and you can create directories and upload files to the endpoint and share them with collaborators.
UTSA Endpoint Policies
If you intend to use the UTSA endpoint there are user policies you must abide by and policies on the endpoint to be aware of.- You're responsible for your data on the endpoint.
- Your data on the endpoint is not backed up, so it is unrecoverable if accidentally deleted by you or a collaborator you've given access to. If the data is important and needs to be kept long term submit a ticket on service now under Server or Storage Consulting and fill out the form explaining your needs.
- External users to UTSA that have been given access to a guest collection are expected to follow UTSA's HOP Acceptable Use Policy outlined here.
- As data is not meant to be kept long term on the UTSA endpoint, we ask that you clear out data you don't need to free up space. The RCSG team reserves the right to delete data that has not been touched in over 30 days.
Workflow for creating a guest collection
In this scenario you and an external user want to share data. The UTSA endpoint is always connected to app.globus.org. You and the external user will need to install Globus Personal Connect and log into the globus app as well. Getting started instruction for Globus are here at this link. Here in the workflow diagram both users have logged in to app.globus.org.
 When you log into globus search for the UTSA Endpoint and request access. If you already alerted the RCSG team you intend to use the endpoint there should be a user directory matching your UTSA ID on the file manager. You can change directory into it and create files and folders, as well as download from other endpoints like the download example in the getting started section showed.
 Once you get into your directory you can use the new folder icon
  Now change directory into the folder you just created for uploads/downloads. Connect to the collection you want to upload files from in the second collect in the file manager. In this game your personal collection on your machine, but it can be any collection you want to transfer data from:
 Now you will be connected to your new directory directory and personal collection so you can transfer files:
 At this point, you've just uploaded files to a directory. To share with the external user, you will need to turn the directory into the root of a Guest Collection. To do this go to the file manager again, and hit the Share icon
  to open the prompt. It should look similar to this with your information in the indicated sections. Make sure the Directory field has the directory you intend to share for this guest collection and give the Display Name something descriptive for collection (lab name, names of both agencies, project number, etc). Fill out the other fields as needed.
 Once you are done click the Create Collection button to create the guest collection.
After you're created the guest collection you can give others access by clicking on the Add Permissions - Share With button
Once you are done click the Create Collection button to create the guest collection.
After you're created the guest collection you can give others access by clicking on the Add Permissions - Share With button  .
When the prompt comes up you can enter in the globus user name or email address of users you'd like to give access to. You can set specific access levels for each user or to the entire directory. In this case we'll just add our external user to the share.
.
When the prompt comes up you can enter in the globus user name or email address of users you'd like to give access to. You can set specific access levels for each user or to the entire directory. In this case we'll just add our external user to the share.
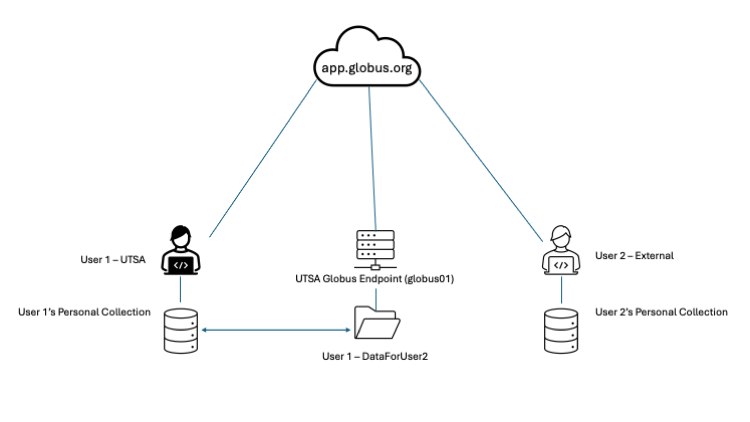
 After you add the permissions User 2 will recieve an email link from globus to tell them they have access. User 2 can also search for the guest collection on globus collections and connect that way. Once the user connects you with both now have access to the Gues Collection rooted in the directory you designated, in this example /~/DataForUser2. Conectivity can be represented like this:
 Now both users can log into globus, upload, download and modify files in the designated directory.
 Edit | Attach | Print version | History: r7 < r6 < r5 < r4 | Backlinks | View wiki text | Edit wiki text | More topic actions
Topic revision: r7 - 31 Oct 2025, AdminUser
Ideas, requests, problems regarding Foswiki? Send feedback